Weaving a sun visor hat
25 October 2018Click here to visit an upgraded version of this blog post on my new website at alibrown.nz.
 When I notify buyers of my books that their order has been sent, I ask them how they found out about the books. There are many answers to this question — people have heard about them through friends, weaving groups, schools or university courses and often, especially overseas buyers, people discover the books through internet searching.
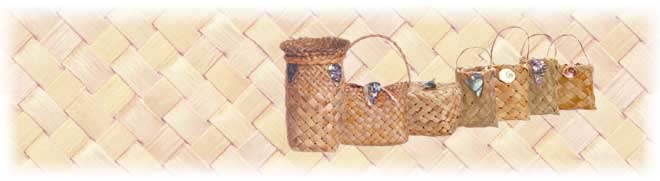
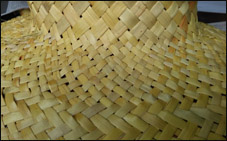
 I recently sent my book Weaving Flowers from New Zealand Flax, to Deborah Tuzon in Hawaii. She wrote, “I am a lauhala weaver who has not been able to weave for almost 8 years due to osteoarthritis in both my thumb joints. Surgery was done in both so now I am starting again. I used to make a flower that looks like an anthurium and I had lost my example. So I was looking online at different websites and I saw a flax flower on Pinterest that reminded me of it. It led me to your site. I have been making flowers for my crownless hats.” The flower Deborah has woven for her hats, which are illustrated in the stack of hats in the first photo on this page, is the flower I call an Arum Lily on pages 56 - 63 in my Flowers book.
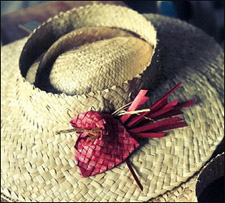
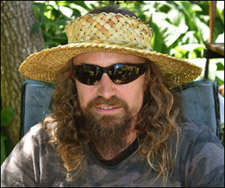 Hats, or pōtae, are fun to weave and this style is a good one for beginners to start with. To weave a crownless sun visor-style hat similar to Deborah’s lauhala one and like the one pictured here, you can use instructions from my book Weaving Baskets, Backpacks, Boxes and Other Projects, which, although they are instructions for weaving baskets, can be used for this style of hat too. Start by working out the size you want the crown of the hat to be. This is the measurement around the widest part of the head where the hat will sit. Use the instructions for weaving a cylinder on page 119 of the Basket book and add enough strips to the cylinder to make the size for your hat. For a size of 56 cm circumference, I used 68 strips of just over 1 cm wide (which dried to 1 cm wide) for the cylinder. Once the cylinder, or crown of the hat, is woven and joined, finish off one edge.
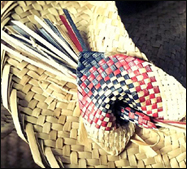
 Now add in extra strips for the brim at the other edge of the cylinder. For this hat I split the strips to make a finer weave for the brim. I wove one row and then added 23 cm strips of the thinner .5 cm width, making 46 strips added altogether (the added strips are doubled over to use both ends). See pages 101 - 103 of the Basket book for instructions on how to add strips in. Weave a few rows for the brim — I wove a wider brim but it can be narrower than this — and then finish the edge of the brim off. The crown of this hat is a bit high and I suggest weaving 3 or 4 rows for the crown rather than the 5 rows that I wove.
If you weave a hat like this, do send me some photos that I can add to this post. Everyone weaves differently and it’s great to share ideas.
© Alison Brown 2018.
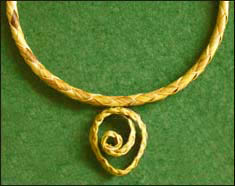 Crafting personal jewellery from natural objects is a universal and ancient pastime so it’s not surprising that people who work with New Zealand flax, harakeke, make jewellery as well as baskets, hats and other larger items. A variety of interesting jewellery pieces can be fashioned simply by plaiting four strips of flax into either an enclosed, rounded plait or an open curved plait and then shaping the plait into a necklet, earring, brooch or bracelet. For example, the pendant illustrated above shows the rounded plait being used to make a necklet and the curved plait being used to make a pendant shape to hang from the necklet.
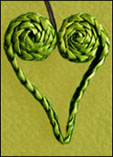 The curved version of this four-plait works well to make various shapes of pendants, like the two heart-shaped pendants illustrated here. The pendants are made by curling the plaited flax into a koru shape — a spiral shape based on the appearance of a new unfurling silver fern frond — at one end and then curling it up in the reverse direction the other end, leaving a single piece of plait in between them. The point of the heart is shaped by pinching together the single strip of flour-plait
 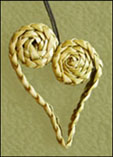 between the two koru shapes while the flax is still soft and shaping it into a curved point. The heart shape is held together with a small stitch with thread in the centre. A waxed linen thread is added for hanging. The green pendant’s shape is a classic heart shape but I rather like the offset shape of the naturally-coloured pendant which is made by joining the two koru shapes so they are slightly offset from each other.
 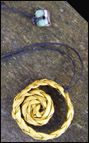 Illustrated on the left is a variation I made of the koru pendant. This design has a small koru in the centre which is encircled with a larger single row of curved four-plait. To complete the pendant, the ends are threaded through into the plaiting of the outside plait, by threading each end twice through into the plait pattern. This secures the outer encircling plait. A waxed linen thread with a loop at one end and a paua shell button at the other end is used for hanging the pendant. I also made a smaller version into earrings.
 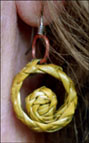 To allow the earring to hang freely and on an angle which shows the pattern fully, the koru circlet needs a jump ring, or extra ring, between the circlet and the earring hook. Unfortunately I only made one of these earrings so have never worn this one as an earring, although I do wear the pendant regularly and have received favourable comments on it. (I must make that second earring sometime!)
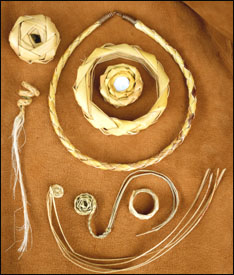 I’ve played around with a few different ideas for making jewellery with a four-plait, including enclosing a small shell or stone in the centre of the koru. The curved four-plait makes a nicely rounded bracelet, or a ring. A smaller version of the bracelet could be used for napkin rings, or with a few more layers, a toggle to hold a scarf if the hole in the centre is a bit larger than the one illustrated here. I like long tails on the koru but haven’t yet found any practical jewellery use for this style, although I can see it being used in other ways. Do you have any more ideas for koru jewellery? I’d love to see them.
 I recently updated the
  It’s not always easy to earn a full living as an artist or craftsperson, and having a detailed documentary record of your work, including your experience and specific skills, will invariably stand you in good stead when offering your services as a tutor, writer, or seller of craftworks. It’s also necessary when applying for funding to be able to show your art/craft history and experience. One way to do this is to have a separate CV for your art/craft work, apart from the CV you use to find employment. For example,
  Back in the early 2000s, I wanted to teach weaving in a local polytech and had a craft CV prepared to help me get a job there. Having worked in the employment industry, I knew it was important to choose a CV writer who understands that making a living from your art or craft is a viable career option and doesn’t take the view that you should aim for a ‘real job’. I chose
 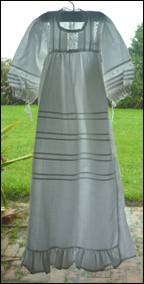 Apart from documenting your work for income-earning purposes, it can be a rewarding and informative exercise to revisit your own work over the years, and my children have also been interested to learn about my craft history. (The photos illustrate one of my early craft projects — a baby gown I made in the 1980s when my children were born, along with a close up of the bobbin lacework I wove for it.) Whenever you work on a CV, you are exploring your own craft whakapapa, or craft history, which gives you a sense of where you picked up your various skills and how they may be influencing the work you do now. Also, the knowledge and recognition of your own experience and abilities can instill a greater confidence in the approach you take to earning an income as a craftsperson, and the documentation of your work gives you a factual and authentic base to work from. When I hold workshops,
 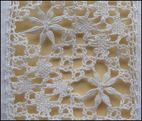 people regularly ask me where I learnt flax weaving, or how I got into it. Although I can pinpoint when I first wove with flax to the late 1990s, and still have the first little kete I wove, after remembering all the various types of craft work I have done over the years, I realise there is a much longer history that has influenced, and continues to influence, my work.