6 March 2018
Click here to visit an upgraded version of this blog post on my new website at alibrown.nz.
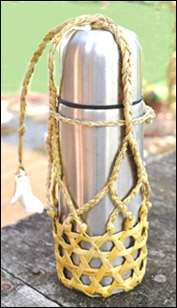 When I completed weaving a visor hat I was left with quite a few ends of prepared strips that I didn’t want to waste. They were long enough to use for a small project so I thought I’d weave a water bottle holder with them. I started with hexagonal weaving but as the strips weren’t long enough to reach all the way up the bottle I carried on with plaiting, joining the plaits as they lengthened, ending with three plaits at the top. Before starting the plaits, I secured the weaving by tying overhand knots with each set of two strips at the point where the strips became too short for further hexagonal weaving.
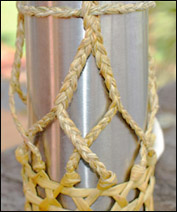
I shredded the ends of the knots and started plaiting each set, adding in shreds as required to keep the plaits reasonably even. As the plaiting progressed, I positioned them diagonally across each other and joined each alternate plait together to make one plait. I repeated this further up and ended up with three plaits at the rim of the bottle. It wasn’t necessary to join the plaits together as they grew longer, but I was in an experimental mood, and felt like trying out this idea.
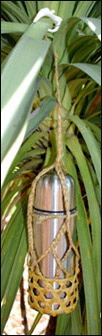 It worked fine and having just three plaits at the top also makes it easy to take the top off the bottle, although I did have to add the extra horizontal plait around the point where the three plaits start to ensure that the plaits sat at an equal distance from each other around the rim of the bottle. I extended the three plaits and then joined them into one plait over the lid of the bottle, plaited this a bit longer and added a loop in the form of a piece of water-smoothed shell. This makes a handy toggle for carrying the water bottle as well as hanging it up in a tree where the breezes blowing around the tree keep the contents cool. This was a fun exercise and although it’s not the neatest item I’ve ever made, it’s a useful piece of kit.
Hexagonal weaving 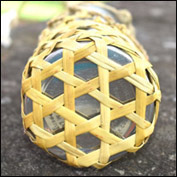 is fun to weave and is well-suited to this project as it’s easy to move from the horizontal weaving of the base to the vertical weaving of the sides. Next time I’ll use longer strips and use hexagonal weaving for all of the holder.
What would I do differently on this project? I’d shred the ends of the flax strips before I made the overhand knots at the top of the hexagonal weaving so that shredded flax could be added if needed to make the knots more even in size and I’d take more care with keeping the plaits even in width. Now, what will I make with the rest of the ends of strips I have left?
© Alison Brown 2018.
Posted in Raw materials, Techniques | 4 Comments »
16 January 2018
Click here to visit an upgraded version of this blog post on my new website at alibrown.nz.
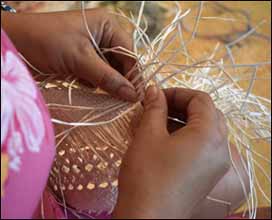
 Weaving is very much part of Pacific Island cultures and I was keen to see the weaving in Rarotonga when I visited recently. I was expecting to see large market baskets and hats with circular crowns woven out of green palm leaves but these were very scarce. What I did see was intriguing and quite unexpected. The main type of weaving practised now is with very fine strips of white palm leaf, sometimes dyed for patterned weaving, used to weave hats and fans.
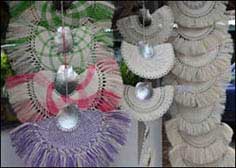 I first saw this weaving at Punanga Nui Market, the Saturday market, where one stall had numerous hats and fans woven with these fine palm strands. Many of the hats and fans were woven in coloured patterns and all were made with very fine strips.
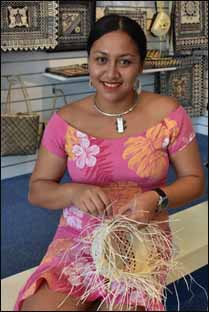 I then visited the shop Pacific Weave, where weaver Nanave Taime was weaving a basket with fine white strips. I wondered what the material was and how she managed to get it so white. Nanave was very happy to share her knowledge, and told me me that the material was boiled palm leaf. I knew that boiling NZ flax, the usual material I weave with, doesn’t whiten it to this extent, so I was interested to try this process for myself. Later that day I tried boiling both dry and green palm leaf but this didn’t make any difference to the colour of the leaf.
 Out and about the next day, I discovered Tarani Crafts and Pearls in downtown Avarua, just past the roundabout heading towards Muri beach, and had an interesting discussion with Tarani Napa, the owner, who is very knowledgeable about traditional weaving. Tarani also has an outlet at the Saturday market.
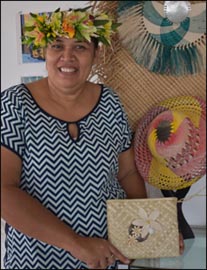 Tarani explained that the white material is part of the new leaf, or rito, of the coconut tree before it becomes green. The new leaf is peeled apart into two different types of strands. The outer fibre is coarser and creamy light fawn and the inner fibre, which is lighter, is boiled to make it white. The strips are very thin and there’s a lot of work involved in getting enough strips to weave with. It’s mostly older weavers from the outer islands — which are covered in coconut palms and a good source for rito — who weave hats.
As I saw some evidence of what I think are earlier types of weaving, such as basic market baskets and fans, and was interested in discovering how the weaving style had changed over time to a more intricate and delicate style. I wonder if this is partly due to the influence of missionaries, as the white hats and fans are often worn for church-going. I searched in the Rarotongan library and museum for information about this but found nothing. If anyone has any more information on this change of style I’d be very interested to hear about it.
© Alison Brown 2018.
Posted in Raw materials, Techniques | 1 Comment »
19 December 2016
Click here to visit an upgraded version of this blog post on my new website at alibrown.nz.
 Many people enjoy creating gifts to give to friends, family, colleagues, and strangers, rather than purchasing gifts. A gift of flax flowers as a thank you, flax containers holding home-made preserves, a little flax kete to hold a piece of jewellery, or a shredded flax tie on a parcel are all received with appreciation, from my experience.
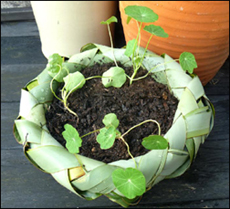
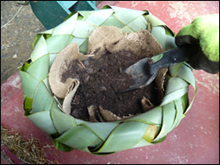 Recently I wove a waikawa to hold some nasturtium seedlings as a gift for a fortieth birthday. The basket was made with 16 full leaves and woven with a square-base. The sides were woven up higher than the intended end height of the basket and then rolled down three times to make a firm rolled edge. A piece of hessian from the sewing kit was used to line the basket to hold the dirt in place. The basket was then filled with potting mix and the seedlings planted.
 Although I used bought seedlings and potting mix, for people looking for gifts of little cost, this gift could be made at no cost, apart from your time, by using materials that are commonly found in people’s homes. The flax to weave the basket is usually a free resource, the material to line the basket can be any natural material, such as cotton or wool, that could be an old unwanted garment or towel, for example, and the seedlings could be found in any home garden. Vegetable seedlings, cacti or self-sown annuals can be easily transplanted.
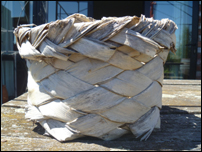 Planters woven from flax don’t stay in perfect condition when left outside. The flax will fade and bleach and parts will discolour as can be seen in this pot illustrated here, which has been outside for two seasons. This container has also been squashed down which accounts for the wonky shape.
If you’d like instructions on how to weave these pots or containers, they are available in my book Weaving a Large Container from New Zealand Flax, which can be purchased directly from me.
© Alison Marion Brown 2016.
Posted in Raw materials, Techniques, Ali's books | 2 Comments »