Weaving a remembrance poppy
1 April 2015Click here to visit an upgraded version of this blog post on my new website at alibrown.nz.
 Each year in New Zealand, as ANZAC day draws near, red poppies, a world-wide symbol of remembrance for people who have lost their lives in war, start to appear. Poppies are usually made from paper or cloth, and lately knitted poppies have become popular. A few years ago I wove a poppy from flax for a friend and he told me recently that he continues to wear it every ANZAC Day. I have regularly been asked about weaving flax poppies, so here is how I made the one for him.
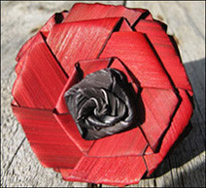
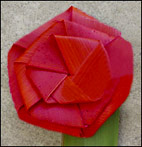 I used dyed flax, one leaf of red and one leaf of black. The red leaf is woven into a Chrysanthemum, instructions for which are on pages 5-8 in my book Weaving Flowers from New Zealand Flax or on the Christchurch City Libraries’ website. Make a flat chrysanthemum by folding three to four rounds of petals. Cut off the pointed ends of the leaf at the centre once there are enough petals and keep the flower flat.
 The black leaf is woven into an small English Rose, instructions for which are on pages 27-31 in the same book. The stem of the rose is pushed through the centre of the chrysanthemum, tied around the chrysanthemum and the ends of both flowers cut off, taking care to ensure that they are not cut off so close to the flowers that they unravel. A brooch backing or safety pin is stuck to the back with tape so the poppy can be worn on clothing.
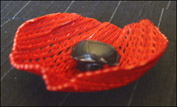 A simple flax poppy can also be made with netted flax that has been dyed red. Cut a circle out of red netted flax and moisten the flax. Push it into a round container that is smaller in diameter than the round of flax is, so that it will curve the edges up to make the shape resemble poppy petals. Take the round of flax out of the container once it’s dry and attach a black button, preferably one with a shank, for the centre of the poppy. The button can be sewn onto the netted flax and a fastening attached onto the back.
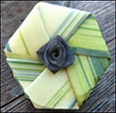 If you would like to weave a poppy without having to dye the flax, you could weave a white one with the leaf from a white hybrid flax, although greenish stripes may show where the back of the flax leaf is uppermost during the folding process. The central rose in the poppy illustrated here is made with brownish/black flax. The white poppy, which used to be seen by some as unpatriotic, and perhaps still is, conveys not only remembrance but also the hope for an end to all wars.
© Alison Marion Brown 2015.
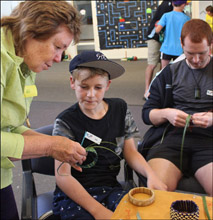 In January this year I tutored two flax weaving workshops at Camp Quality, which is a summer camp for children living with cancer. Weaving
  I prepared the base for each wristband from the flax leaves and split the long length of the strip used to make the band into three even-width strips and the children chose the colour of their weaving strip. They wove the pattern by weaving the coloured weaver over and under the three strips all the way around which results in a checkerboard pattern as shown here.
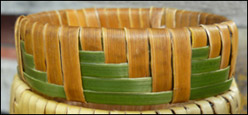 Some children tried weaving more complicated patterns. One used two different coloured strips as the weavers, alternating them at each turn. A couple of others were keen to try the Step pattern illustrated on the wristband shown here. The pattern is made by the way each of the strips around the wristband are positioned before the weaving strip goes over the top of the band. If you’d like to try this pattern, instructions on how to weave it are
 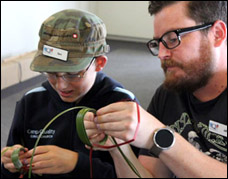 At camp each child has a twenty-four hour buddy who gives them one-on-one support and the wristbands turned out to be a popular choice for the buddies too, a couple of them returning to make a second one. Most people wove the first wristband for themselves and then went on to weave others for family and friends.
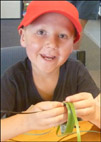 I’ve found from past workshops that weaving wristbands is a popular project and can be woven by children from about five years upwards. The younger ones may need assistance but do tend to get into the rhythm of weaving after a while. This workshop proved how suitable wristbands continue to be for a children’s weaving workshop, as well as being of interest to all ages.
 The same technique used to weave a pattern on wristbands can also be used to weave over the base of a handle for a basket. For example, the handle illustrated here has a
 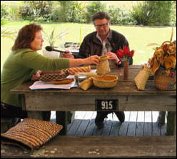 Earlier this year, Cosmo Kentish-Barnes of Country Life interviewed me about flax weaving and the interview was aired on Country Life on 11 and 12 July. (The interview can still be
 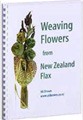 In preparation for the interview I got together some weaving we could talk about as well as my book Weaving Flowers from New Zealand Flax. Cosmo asked questions about the book, the weaving, how I became interested in weaving, how long I’d been weaving for and so on. As I’m working hard to complete my next book, on how to weave baskets, I also chattered on about that.
 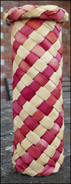 This is the pot with the spiral pattern that I discussed. The pot is started with a plait at the base and the coloured strips are added in the same sequence that they are for a diagonally striped basket i.e. two crimson strips and then two natural-coloured strips alternately on each side. I then wove the sides up and rolled down the top to give the pot a strong rim. As this was an experiment to see what effect the spiral pattern would have on a pot, I used quite wide strips. I think the result is pleasing and would look even better if the pot is made with thinner strips. The black and white kete with the whitebait pattern that I talked about in the interview is illustrated on the
 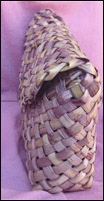 One of the pieces of weaving that doesn’t feature in the programme but took Cosmo’s attention was the soft, muted colour of this pink bag, which is photographed side-on. I mentioned that I’ve sometimes played around with natural dyes as well as chemical dyes, and the bag was an experiment in using red wine as a dye. In the event, this bag used up six bottles of red wine, which he felt was rather a rather a waste of good wine and, in retrospect, I have to agree. I just hadn’t realised how many bottles it would take. At some point, I might try dyeing flax with the red wine skins left over from wine making to see how they turn out.
 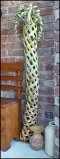 Another piece of weaving we talked about is this long sculptural experiment, woven with the technique that’s used for weaving a large container or waikawa. I started with six long leaves of flax that I pulled apart right down to the end of the butt, ensuring that the two sides were still joined together at the butt. I then wove the sides up as far as I could go with the lengths of the leaves, and wound the ends of the leaves that were long enough around a cylinder so they curled as they dried. Once dry I unwound them from the cylinders and they hang down like curls on a head. This was a fun piece to make although it took quite a lot longer than I expected and was a bit awkward to weave as it got longer. It’s been much appreciated by my cats, who loved climbing up it when they were kittens.
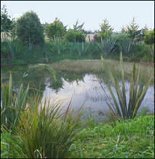 We also talked about the types of flaxes that can be used for weaving and Cosmo wondered if the ones he saw around the garden could all be used. The flaxes that were planted here when I moved here just over two years ago are mostly ornamental and generally only good for weaving flowers. I explained that, since I moved here, I’ve planted a number of weaving flaxes from the
 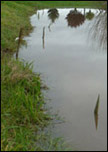 The divisions I planted are now growing well around a winter pond, although they are subject to very dry conditions in summer and very wet conditions in winter. In the middle of a wet winter some of them can be completely covered
 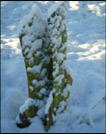 apart from a little tip poking up, but the water recedes reasonably quickly over a few days, and their occasional dunking doesn’t seem to have affected their growth. When first planted in the autumn of 2012 the divisions were small stumps with cut-off leaves. They were covered in snow that winter and covered again the next winter but survived these conditions well.