Flax butt handles
21 November 2010Click here to visit an upgraded version of this blog post on my new website at alibrown.nz.
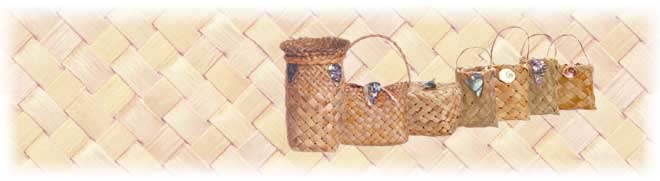
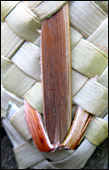
 “What can I use this hard butt end of the flax leaf for? It seems such a waste to cut it up for compost.” This question is one that is regularly asked in my workshops and one that I keep in mind myself. The butt end of the leaf, where it grows from the base of the plant, is very strong and can be shaped into handles for little baskets like the ones pictured here. These handles have attractive markings, ranging from cream to brown to dusky pink, depending on the colour inside the flax leaf, and they are simple and easy to make. I keep a store of them on hand for those times when I’d like to put a handle on a basket but haven’t the time to plait one.
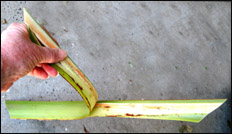 To make the handle, split the flax butt apart down the middle, separating the two parts of the leaf. If the butt end has been cut off the leaf, it may not be that easy to get started so use a knife or sharp object to separate the two sides of the butt apart. Once you’ve separated the sides, pull them completely apart. There may be a sticky gel inside the leaf, which is traditionally used as a skin-repair ointment or as a glue. You can wipe this off, but it will dry into a cellophane-like substance which is easy enough to pull off when it’s dry.
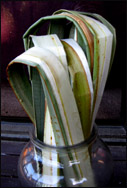 The next step is to bend the butt over and secure it in this shape while it dries. Before bending it over, scrape the side of the butt that will be the underneath side of the handle, as shown on the Preparing flax page. This will help to soften the butt and make it easier to bend. You can bend the butt either way but some of the harder, thicker butts may bend easier one way than the other. Try to bend the butt smoothly so that it doesn’t get sharp folds, as the one on the right has in the photo here. These folds are impossible to smooth out once the flax is creased. Put the bent butts inside a container that will hold them in shape, like the wide-mouthed jar I’ve used here, and leave to dry, or tape them into shape.
When the butt end is dry it is ready to be prepared for using as a handle. Trim the soft edges off and then split the butt into a width that seems suitable for your basket. I find that about half the width is a suitable size. The handle may be longer than you require, so hold the handle against your basket and measure the length that you need. The handle will need enough length to be able to be pushed in along the weaving at the side of your basket with about two centimetres more to fold back up to secure the handle from pulling out of the weaving.
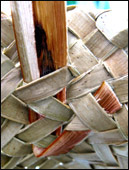 Once you’ve cut the butt to the correct length, trim the ends into a point and then push them down through the weaving on each side of the basket. This can either be done on the inside of the basket, as in the photo on the left, or the outside of the basket as in the photo below — if it’s on the outside it can be turned into a decorative feature. Push each end down into the weaving about two centimeters longer than the final position and then bend the end back up.
 Insert the point underneath the closest strip that it can go under and then pull the handle up so that the end fits snugly under the woven strip, as shown in the photo above. This will secure the handle in place and make sure it doesn’t pull out as the flax dries. Alternatively, split the pointed end of the handle into two and bend one point up one side and one point up the other side as shown in the photo on the right. If the handle is very dry, it may be necessary to moisten the end before you bend it up, otherwise it may split.
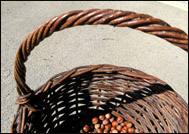 Using a hard but pliable material for a handle is a common way to make a handle in basket-making, although often the core material is covered with another material, like the handle on the willow basket pictured here. In this basket, the core is made from a thin bent willow branch, and this has been covered by winding finer willow branches around this core.
Although I think the flax butt handle is attractive as it is, with its subtle colouring and simplicity, it could also be covered and there are a variety of ways to do this. One way could be by making a patterned covering using the same technique that is used to make the wristband in the post Bands for the boys and girls. If this technique is used, it would be important to make sure that the pattern on the handle is integrated with the style and pattern of the basket, if it has one.
© Alison Marion Brown 2010.
February 6th, 2011 at 11:45 am
Kia ora Ali - I am a weaver. A couple of years a go I purchased one of your flax flower books with a group of other weavers. I am looking for a supplier of paua shell (in particular - the piece of the paua that forms the thickened rim or lip of the paua). About 19 years ago I was able to purchase double tumbled paua shell pieces from a place ‘Southern Shell in the South Island. Do you know of such a company/ wholesaler in the South Is. Could you perhaps direct me to a supplier IN NZ. I have been surfing the net - but am becoming more and more frutstrated as I have had no luck in finding what I want. Thank you for your help
Naaku noa Noa
February 6th, 2011 at 5:18 pm
Kia ora Noa
Yes I do know the company you mean. They are now called Ocean Shell and they are based in Riverton, near Invercargill. They sell all sorts of things including the paua rims that you’re after. I’ve bought paua from them for a number of years and find them good to deal with.
February 8th, 2011 at 3:29 pm
I agree that it seems a waste to throw the flax butts away. Do you think the they could be used to make a strong basket? Or could they be used for the base of a basket?
February 10th, 2011 at 7:57 am
Hello, my name is Lee Rzoska and I am a weaver in Golden Bay. I was taught to use the whole blade, butt and all to make a herring bone bottomed basket. You dont prepare anything but these baskets are quicker and easier to make with two. They are great for the garden or anything really.Regards Lee
February 10th, 2011 at 6:20 pm
Hi Kate and Lee
Yes Kate, as Lee mentions, there is one particular style of basket that is made with the whole leaf including the butt. I hope to include instructions for that style of basket in my next book which will be a book on basket-making.
March 16th, 2011 at 1:02 pm
Can u email me how 2make a fish please thanxs
March 16th, 2011 at 8:46 pm
Hi my name is Pukerewa I just purchased your second book on flowers it is so cool I love it I can’t wait for your next book to come out I live at Takou Bay in the Bay of Islands which I just love but I have a question to ask you about the plant pingao we have some here at home we used to have abundant of this beautiful plant but its not as much as use to be which is really sad so my brother and I have decided to fence off the sand dunes counting to get the other whanau to agree but the question I want to ask you have you got a book about what we can weave with this plant also any other information or if you know of a book that I could purchase it would be great also I can’t wait for the book of basketmaking thank you Pukerewa
March 17th, 2011 at 8:27 am
Hi E Thompson
Instructions on how to make a fish are in Mick Pendergrast’s book Fun with Flax, which I mention on the Reviews page of this website. The book should be available at your local library.
March 17th, 2011 at 8:43 am
Hi Pukerewa
Thanks for your comments about my book. I’m glad you’re enjoying it.
Good on you for nurturing your local pīngao plants and working with your local whanau to do this. You may find your local council or Department of Conservation will assist with this project as well.
I don’t think there are any books about weaving with pīngao but you may find the little book Pīngao: The Golden Sand Sedge which I mention on the Reviews page of this web site useful as far as looking after the plants is concerned.
Also, have a look at my blog post Growing and weaving pīngao where you’ll see some weaving baskets that have been woven with pīngao and also be able to read some discussion about weaving with pīngao.
I suggest you can make anything with pīngao that you can make with quite thin strips of soft flax, although you are limited by the length of the strips, so you’ll only be able to make smaller things. I’ve found it’s not as strong as flax so it will need a little bit more care when working with it.
Good luck with your project and do keep in touch about it.
April 4th, 2011 at 10:16 am
Hi Ali,
Received your beautiful, wonderful book. It is truly an inspiration. Have very moderate weaving experience, your photos and instruction’s are great. Working on the camelia today. Can’t recommend this book enough. Do you ever have plans to teach in California? Lots of Flax available!
April 10th, 2011 at 12:45 pm
Hi Maggie
Thanks for your comments about the book. I’m glad you’re finding it useful.
I’d love to teach in California! The best way to do this is have someone arrange and sponsor the workshop. Do you know of any groups who would be interested to do this?
April 21st, 2011 at 9:49 pm
Hi Ali
I am a great fan of your book and also your website and have spent many hours reading and re-reading all of the posts of here. I have a problem that I am I facing at the moment, that I am hoping you my be able to help me with. I am a self-taught weaver and learn mainly by studying photos and various books about weaving. I am trying to learn how to finish the bottom of a kete whakairo and need to learn how to do this. I have made a kete today and am trying to teach myself how to do the bottom join, but with not much luck. I am not able to attend any weaving workshops and do not know anyone in my area that does raranga. Here is a link to my facebook page which has some of my work posted (http://www.facebook.com/photo.php?fbid=10150160510923966&set=t.830913965&type=1&theater)
Please, any help you could give me would be greatly appreciated. I dont need photos or very detailed explanations, so hopefully that will make your reply a little easier.
Thank you and I hope to hear from you soon
Careata
April 23rd, 2011 at 11:01 am
Hi Careta
Thanks for your comments about my book and website.
There are different ways to create a kete whakairo so it will depend on which way you have started it but I’m assuming you have made it as a cylinder to start with, as you say you are about to do the bottom join. If you have woven the kete with the underside of the flax strips on the outside, then you can join it at the bottom using a variation of what I know as the double lock which is illustrated on page 88, as an alternative finish for a hat, in the book Te Mahi Kete by Mick Pendergrast. You will need to press both sides of the kete together and work this finish with strips from both sides. It’s a bit tricky to start but as you are used to working things out, you should be OK. An alternative method is to work a single lock all the way around the base of the kete (pages 48-49 of Te Mahi Kete) and then plait along the base with the strips left at the top.
If you have woven the kete with the right side of the flax strips on the outside, one way to finish it is to plait the bottom. Do this by pressing the sides together and work a French plait along the bottom of the kete from one corner to the other with half the strips from each side, and then plait back the other way with the other half. In this version of the French plait, pick up every second strip from each side to include in the plait as you work along the bottom. The plait will get thicker as you work along. To my way of thinking, this is not the best finish for a kete, as it can be bulky, and I don’t think it is generally used for kete whakairo, so I suggest you try and turn your kete inside out and do the other finish, if you have actually woven it the right way out.
Hopefully some other weavers may write about other methods here.
Let me know how you get on.
Incidentally, I cannot view your Facebook page because I am not a member of Facebook, and Facebook limits access to the page to members only.
July 28th, 2011 at 2:50 pm
Hello Ali
I have a question, I have some flax puti puti and I was wondering - I would like to spray paint it.
1. does the puti puti needs to be fully dry before I spray painting it and
2. what type of paint ( arcrilic )?
Await your reply and kia ora.
September 17th, 2011 at 9:53 pm
Kia ora Ali still trying to get the weaving nice n tight and even.
Im a beginner/intermediate weaver in Invercargill, and purchased your putiputi book. It is awesome, it has been fun making the different putiputi. I also look forward to your kete pukapuka. I have bought from the Riverton shop paua and as you say they have all the parts of the paua, my favoutite is the bit with the natural holes. I have made 2 items using the whole harakeke leaf - basket and a cylinder like a big vase for putiputi, tutor taught us and the basket has been our most excellent inside wood basket this winter. I just might have a go at the butt handles and decorating them. Not ready to add extra’s to my kete yet
Keep up te tino pai mahi! Auriette
September 19th, 2011 at 5:09 pm
Kia ora Sha
I’m sorry for taking so long to reply to your query. I don’t spray paint flax at all so I don’t have any experience of how it works. However, I imagine that it would be good to have the flax dry before you spray paint it as the flax will shrink a bit as it dries which will crack the paint if the flax is painted before it dries. I imagine that acrylic would be OK to use.
September 19th, 2011 at 5:12 pm
Kia ora Auriette
Thanks for writing about your weaving. The Riverton shop is good for paua isn’t it?