Flax angel with flaxen hair
17 December 2009Click here to visit an upgraded version of this blog post on my new website at alibrown.nz.
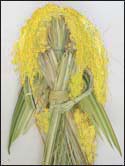
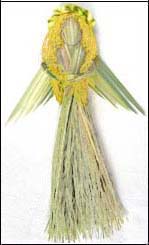 The flaxen-haired angel in the photo is a variation on the flax angel I posted instructions for at this time last year. This angel is a bit more fiddly and long-winded to make but I think the extra effort is worth it. I dyed her hair with yellow dye to give her golden locks but it’s not essential to do the dying if you don’t have access to yellow dye. Her halo is another addition this year and her wings have been shaped to make them more feathery. I hope you enjoy making her.
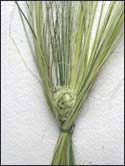
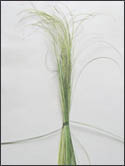 Start making the angel by shredding some flax with an animal comb or fork and tying a bundle of it with a strip of flax. Tie it with a double knot quite near the narrow ends of the shreds.
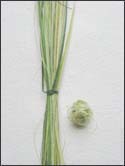 Pull some of the waste flax out of the comb you have used to shred the flax with, and roll it into a small ball.
 Position the flax ball into the middle of the shredded flax just above where it has been tied. This is going to give some shape to the head. It’s quite tricky to keep this flax ball in place so you may find it’s a good idea to put some glue at several points around the circumference of the ball to hold the shredded flax in place as you continue to make the angel.
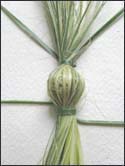 Tie another strip of flax at the top of the flax ball making sure that the flax shreds completely surround the flax ball.
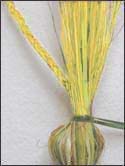 At this point I dipped the long thin ends of the shreds, up to the top tie, into boiling yellow dye, as I wanted the angel to have golden curls, but this is not an essential step. I used Teri Golden Yellow dye, and, as I used a flax with quite a lot of white in the colouring, it only needed a brief dip in the dye.
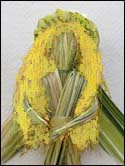
 Now plait the long thin ends that come out of the top of the head into long braids. Separate the fibres carefully and make sure you are using fibres that come from the same area of the head for each braid.
 Shred a little bit more flax for the arms. Tie the shreds together in the middle to make a bundle and then slip this in between the shredded flax of the body. Push it up so that it’s right underneath the tie for the neck. Tie another piece of flax around the body below the arms to create a waist.
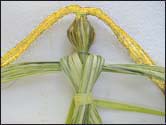 Now shred some more flax and divide it into two bundles. Drape one bundle over the right shoulder and bring it across the front of the body to the left. Drape the second bundle over the left shoulder and bring it across in front of the body to the right. Tie these in place around the waist with a wide strip of flax.
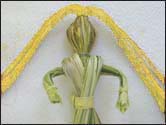 Bend the arms around to the front, tie a thin strip of flax around the flax at the right distance to make wrists for the arms and then cut off the ends of the flax, and shaping the ends into hands. Hold the hands together temporarily with a tie of flax so that as the flax dries, that arms stay in the bended shape.
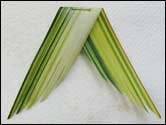 Now make the wings. I’ve used a thin, soft variegated flax for the illustration here but the thinner flax tends to curl up too much as it dries so I suggest you use a thicker flax for this style of wings. Take a piece of a flax leaf and scrape a blunt knife along both sides to soften and dry it a little to prevent the wings from curling up. Fold the flax on an angle with the fold at the top and a piece of flax coming down at an angle on each side and cut these sides into wing shapes. Staple the pieces in place close to the fold. Split each wing into about five strips just a bit over halfway along the wing. Use fine scissors to round the end of each strip and then cut up the strip a bit to narrow it and to give a feathery effect.
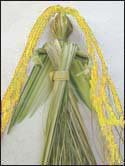 Position the wings just at shoulder height on the angel and attach them with glue or double-sided tape or a staple. I used double-sided tape which I find holds the wings securely.
 It’s now time to unplait the braids and let the angel’s hair down! Or you could leave the braids in place, for a more funky look for the angel. If you do this, I suggest you plait some more braids separately and then sew them onto the angel’s head as they could be a bit sparse otherwise.
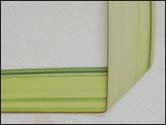 To make the angel’s halo, take a thin strip of flax, about .5 cm wide and as long as you can get it without using the tough bit of the leaf. Soften it with a knife and then fold it at right angles in the middle of the strip. It’s easiest to do this on a flat surface to start with.
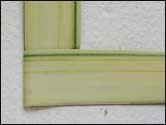 Take the end of the strip that is out to the left and fold it across to the right over the first fold.
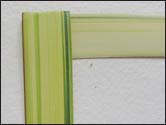 Take the end of the strip that is pointing up to the top and fold it down over the strip pointing to the left, folding it neatly against the other strip.
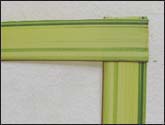 Continue to fold the strips over each other like this, until you have used up all the length of the strip. Make sure you fold the each strip squarely and closely up against the last strip otherwise the halo will be a bit loose, which may not be appropriate for an angel!
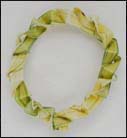 Hold the ends closely so that the folded strips don’t come undone and then curl the strip into a circle. Attach the ends together so that the halo is the right size for the angel’s head.
 Attach the halo to the back of the angel’s head with glue or double-sided tape. Trim the long hair and arrange it so that it sits prettily around the angel’s shoulders and your angel is completed.
I recently received a letter from Kathy of Takaka who writes “We had an excellent hui with the local primary school (40 kids) who loved making your angel. They all went home clutching their one, along with a poi and kowhaiwhai pattern they had coloured in. A happy and successful first visit to our marae for a lot of them.” It’s lovely to hear that people have enjoyed making the original angel and I hope you enjoy making this version. Do send me a photo if you have your own variations.
© Alison Marion Brown 2009.
December 19th, 2009 at 5:05 pm
Thankyou Ali,
So kool.
Im teachin my mokos the angel 4 xmas
December 20th, 2009 at 1:05 pm
Hi Ali
you are very generous to go to the trouble with your clear instructions for the new angels.
I am teaching my grandchildren also
Ann
April 5th, 2010 at 9:25 pm
Kia ora Ali
I have so appreciated your book! As soon as I received it, I was preparing flax and making the designs you have illustrated so beautifully. However something I didn’t expect was, that your work would inspire me to think creatively and to revisit the skills my mother had taught me, many years ago. Thank you for being the catalyst for this and for sharing your gifts and talents so willing. You are a blessing and are indeed blessed - kia ora.
April 18th, 2010 at 12:02 pm
Kia ora Arihia
It’s so pleasing to hear that your creativity has been inspired by the book, and that you are bringing the original skills you’ve learnt into your creativity. I’d love to see some of your work if you get the chance to send me a photo or two.
June 19th, 2014 at 9:28 pm
Hi there
I am wanting to find someone to make a set of piupiu for a school kapa haka group. We are wanting a woven band but a stripped flax skirt. I would appreciate any help here.
Thanks Angela
July 6th, 2014 at 3:13 pm
Hi Angela
There are weavers available who make piupiu. Check out the Links page on this web site. I have also asked a weaving group in Christchurch if they can make them. I’ll let you know when I hear back from them.